You never have to worry about going on holiday again – A SIMPLE and EFFICIENT way to keep your customer engaged!
As Paul J Meter once stated “Communication - the human connection – is the key to personal and career success” . Our aim is to help you succeed and gain a large customer base whilst making the day- to-day running of your company a lot quicker and smoother.
Automated Campaigns are a great way to ensure regular communications are sent - you are able to schedule sequences of emails and tasks; create Lead/Sale, send SMS...it’s so great that you don’t even have to be sat at your desk to do it. Once you have done your prep the system will do the rest for you...

Where?
To find this element within the system, you have to:-
Go to Automation >
What Next?
Enter a reference name and press " Create New Automated Campaign".

Getting Started:
You now have the choice between a Linear campaign or a Date-based campaign.
In this guide we deal with Linear campaigns. There is also a guide to creating Date-based campaigns.

A Linear campaign
This is where you build the traditional automated campaign with your chosen Steps and when you start the campaign you feed contacts into the funnel to begin the journey through your Steps. You are able to select what you would like to use for each step. i.e. Email,Task, Lead/Sale, SMS and also Add to/Remove from Group and also Remove from Automated Campaign.
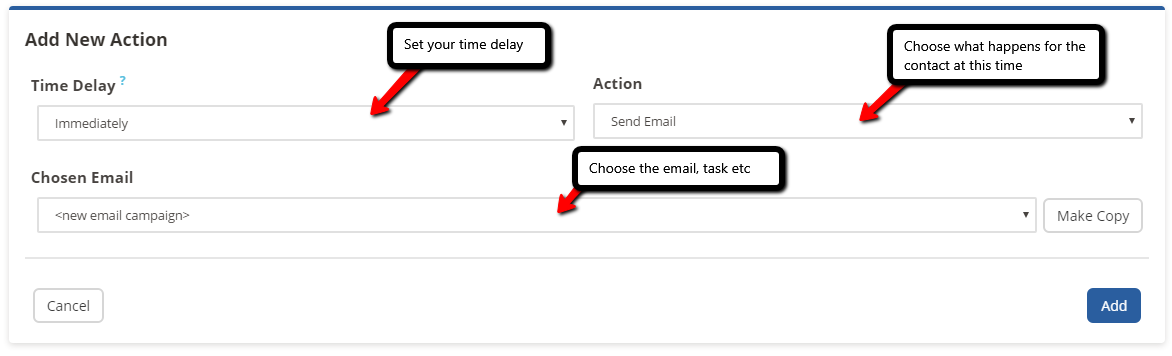
Once you have selected what you would like to create, all you have to do is click on "Add" as this will allow you to complete the Action. You will also need to state when you would like to the email to be sent or the task to be created, e.g. immediately (as shown above).
Creating a New Action in the Sequence
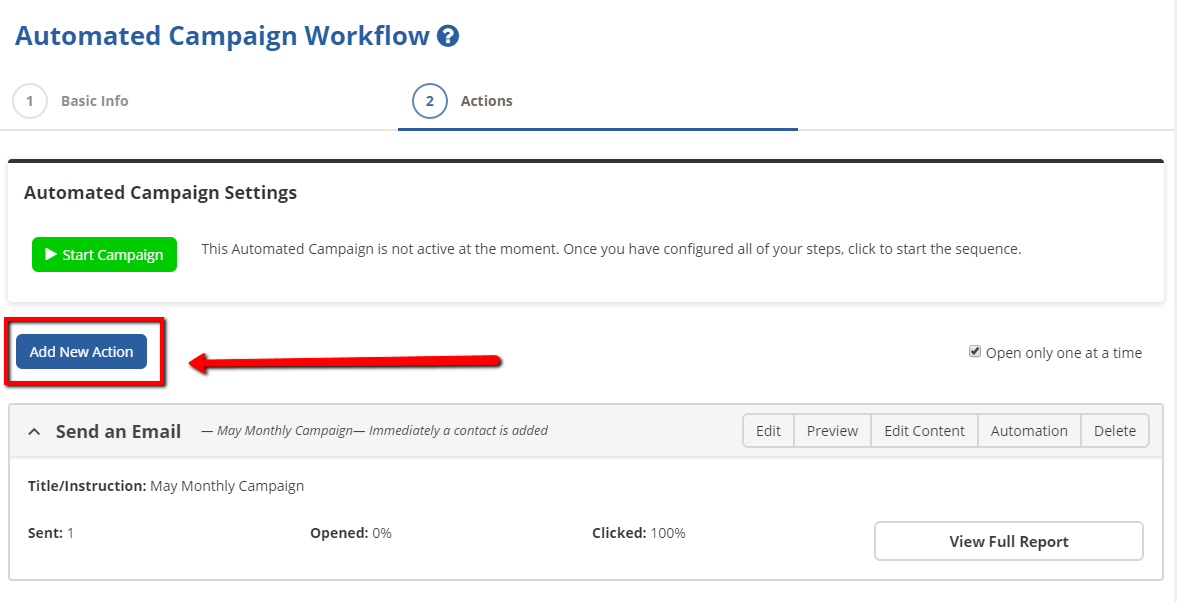
If you would like to create more than one Action in the sequence of this Automated Campaign - you can and it's pretty simple. All you have to do is press "Add New Action".
Creating an Email Action
You may decide that you would like to send an immediate response to a customer when they have signed up to your website, either to say a small thank you or add them to a journey of emails that you wish them to see or it could be a build up to a massive sale that may be occurring.
There are four steps to the sequence:
1) Basic Info is where you will need to enter in all of the basic information for your email. Select or type in the relevant information and remember the importance of the subject line.
2) You will now need to pick the relevant template that you wish to use.
3) Once you are ready, all you need to do is add the important content (including text and images) you wish to send to your customer so be serious, be fun but ensure that you are creative to really capture the attention of your customers. You can also add Customisation tags to your email to make it really personal and friendly.
4) Now all you have to do is to add Actions such as adding in clickable links to auto-feed your recipients onto another automated campaign and Click "Finish" to continue building those steps.
If you do want to make any amendments to your email content, all you have to do is press "Edit Content" button at the top to go back a step.
Creating a Task Action
If you want to create a sequence of tasks or if want to add tasks along with emails, you can.
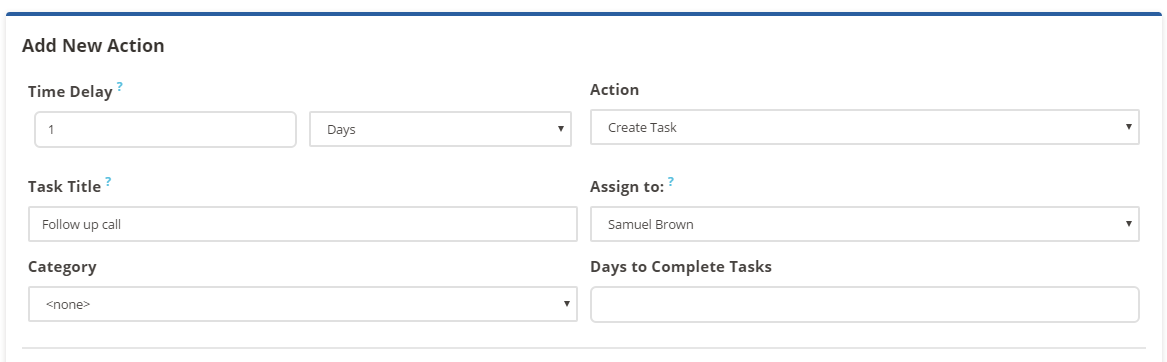
1) Either create the initial sequence by selecting the Task action or click "Add New Action" and select it then.
2) Select when it should be set.
3) Now add in the relevant information and select who needs to complete the task.
4) Once you are happy, click "Save"
Please Note!
These tasks will not send you a reminder but they will appear on My Day/ My Week on your home page.
Creating a Lead/Sale
This is quite a handy tool, for example if you are planning
on having a sequence of emails with the ultimate goal of customers purchasing
your services or products you could create a Sale/ Lead so when they reach a
certain point this will automatically be created for you. All you will have to
do is go in to the lead and update with any information you may have.
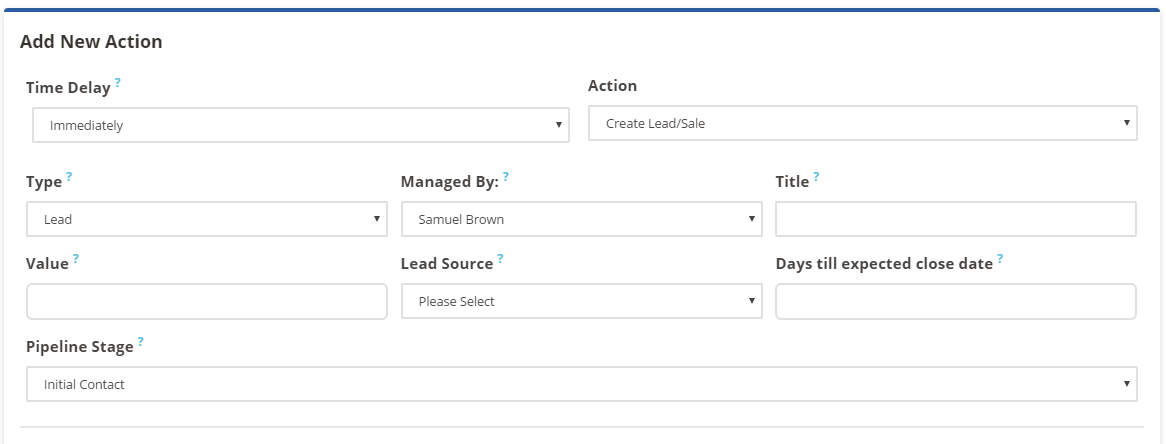
1) Again either create the initial sequence by selecting the "Lead/Sale" option or click "Add New Action" and select it then.
2) Select when you would like it to be set.
3) Now enter the relevant information
4) When you're ready just click "Save" - this will add it to the Automated Campaign
Creating a SMS Message
This is a great feature that we have added to the system which allows you to add an SMS message to the sequence of an Automated Campaign. Now you are able to send them a message in the sequence of events - it could be to remind them of an upcoming event they are interested in or if they have had a service or brought a product from you, you can thank them for their custom. Whatever the reason... this is how you do it.
1) Again either create the campaign or click to "Add Action"
2) Select the relevant Time Delay and the Action "Send SMS" and click Next
3) Now enter the relevant information and click "Save"

Completing your Automated Campaign
Once you are happy with all of the Action steps in the sequences and are ready to go, just click on the "Paused" status to change it to "Started". Only then will the sequence start and emails be sent, task and leads will be set up, SMS sent, contacts added to groups...
