The Activity Tab allows you to see a more detailed breakdown of what your contacts did with the campaign - who open the campaign and how many times and the same for the clicks - so whether they clicked on any URL, Document or Emails links you added to the email.
It gives you all this detailed information in an clear and simple way, it also allows you to filter the information so that you are able to become more targeted with the emails that you send or even if you wanted to export that information.
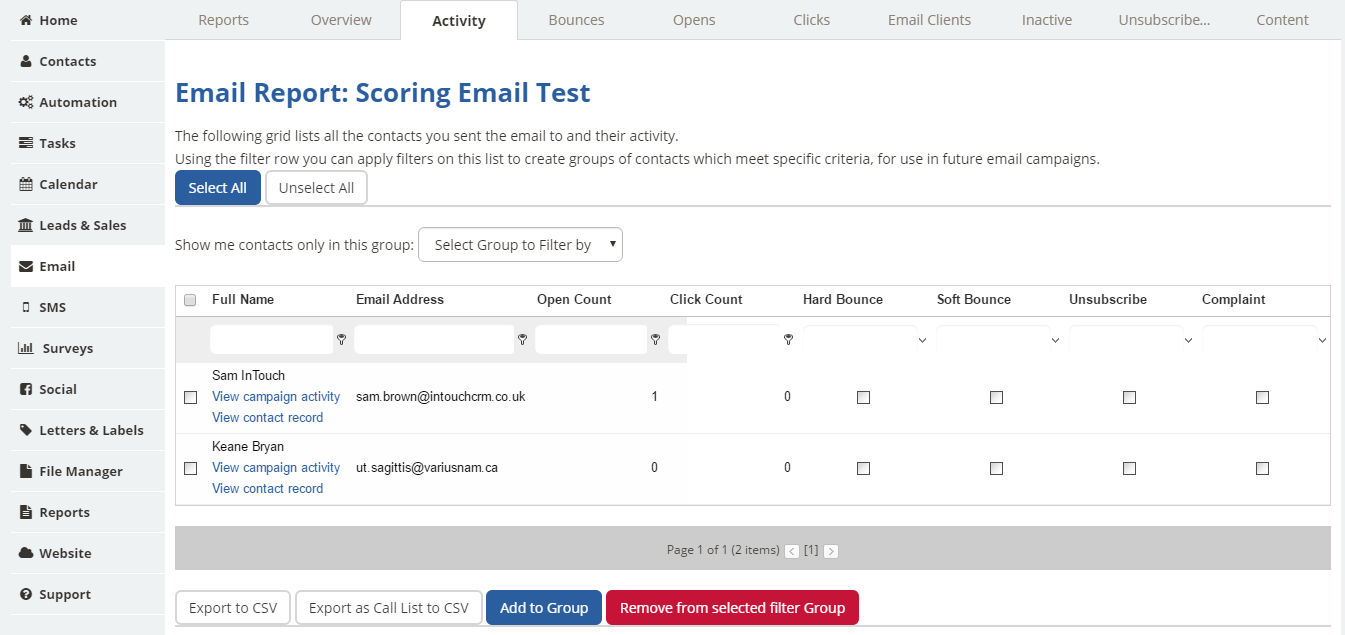
Here's a quick summary of the filters that you are able to use:
| Full Name - If you are unsure whether a customer received an email or even if they called and mentioned they didn't receive it, you can double check here to see what may have happened.All you will need to do is enter their name. | Email Address - If you wanted to check which email address you may have used to send an email campaign or just wanted to double check. Just copy and paste or enter their email address here. |
| Open Count - Here you are able to filter the information, to see who opened your campaign and who didn't. This is a key if you wanted to start segmenting your Contact Data to send more specific emails to each group, as you may want to target them in different ways. Please Note! Some people might not register as an open if they don't download the images, always check the click count column as well. | Click Count - This filter allows you to find the top people who have clicked links within your email campaign, as well as applying a filter to find everyone who has actually clicked a link within your campaign |
| Hard Bounce - This section shows you the people who have Hard Bounced from your campaign. | Soft Bounce - This section shows you the people who have Soft Bounced on this campaign, however you can still continue to communicate with them. |
| Unsubscribe - This section shows you the people who have Unsubscribed from your campaign. | Complaint - This section shows you the people who have Complained about your campaign to the ISPs. |
If you would like to use the filters, all you have to do is use the key icon and select which you options is relevant to you and begin typing what the filter information should be. For example if you wanted to filter who did nothing with your Email. You would need to go to the Activity field and type in 0 and select the Filter Key "is equal to".
Here is a quick summary of the actions you are able to do within this section:
| Export to CSV - This allows you to export all the information currently held within the grid. This means that if you have applied any filters to the page then only that information will be exported | Export as Call List to CSV - This allows you to export all the information currently held within the grid. This means that if you have applied any filters to the page then only that information will be exported. The Call List option exports the basic information along with contact details for a telesales team to follow up. |
| Add to Group - By either ticking the boxes next to the contacts or by using the "Select All" button at the top of the Activity grid, this option will allow you to either add the contacts to a new group or an existing group. | Remove from selected filter Group - By either ticking the boxes next to the contacts or by using the "Select All" button at the top of the Activity grid, this option will allow you to remove the selected contacts from a group that you select. |