If you wish to send a quick and easy Plain Text Survey to your customers, you can... all you have to do is go to the Survey Section (located on the left side of the system). With this type of survey, you are unable to track the email that is sent using this survey type, if you wish to see who has opened the email and clicked on the link - you will need to create a HTML Survey.
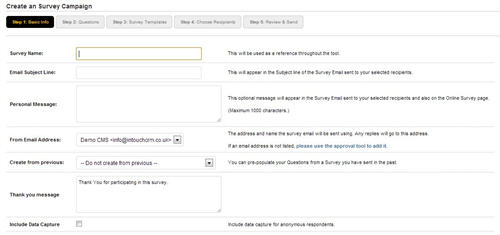
Once you are in there click on "Create New Survey": You will meet with this screen shown below, just fill in the relevant information ... we have added helpful hints and information in this section to explain what each of the fields do.
Just a Couple of Quick Tips!
Although it is a survey you are creating, it is still sent out via Email so for the subject line think of something which will encourage your customers to open it and take part in it. Click here for some helpful hints on Email subject lines.
Make sure that your Survey contacts are contact preferenced for Email.
For a plain text email address, we suggest to write a Personal Message and a Thank you message here which will invite your customers to take part in the survey. However, if you are wanting to create a HTML Survey, please leave this part blank!
Finally, before you move on to building the questions, you can decide if you want to include a data capture form. When creating a survey within the system, you get a link to a web version which allows you to post it onto Facebook, Twitter and other social networks. Adding in the option for data capture, means that any one who completes the web version has to give you their details - if they already exist in the system or have been sent the email version, it counts against their record.
You've completed the initial start up step and now you would like to add the questions to your survey (without these questions, you are just sending an email).
Initially it will say "Your survey has no questions!" but that is about the change! To start adding in a question, click on "Add Question" - this will allow you to start fleshing out your survey with the questions you would like to ask. So, all you have to do is type in the relevant questions and select the type of question you wish to ask.

If the question you are asking includes an answer that your customers have to choose from, please type those in the Answers section.
Please Note!
Each answer has to be on a different line.
Now Comments Allowed and Question must be answered select boxes - these are basically giving you the option with every question whether you would like your participants to add comments further to the answer they have given or whether they need to answer that specific question (which means they aren't able to complete the survey until they have)
Just a Small Helpful Hint!
If you have created a masterpiece survey of 50 - 100 questions, then we would suggest not to tag all of the questions as "Required" as the chances for completes would be minimal - to get the best results things need to be short, sharp and focused so that it won't take too long for your customers to answer.
Once you have completed creating the question, this is is an example of how it may look.

If you have made a spelling error or didn't like the format of the question, you are also able to go back and edit it by simply pressing "Edit Question"
Another great thing about the system is that you are able to amend the order your questions are in, all you have to do is press "Edit Display Order" and rearrange it.
Once you have entered all of the information, just click Save to proceed to the next step!
This is where you choose the look and feel of not only your Survey but the email that is sent with it. If you wish to send a Default Plain Text Invitation Email, this is where it will gather the information from the first step that you've entered (Personal Message and Thank you Message) and in the Survey Template, also leave the Plain Page selected.

You're nearly there... now you will need to choose who you would like to send the email campaign to; this could be an individual contact who has just made a purchase, been in contact with you or whether it was just to gather customers or people's opinions about what you are offering or whether you would like to have suggestions from them.
Either way we give you a select of options to choose from to enable to send you that really specific survey to gain an insight to what your customers are thinking.

So you have selected the relevant options and now you're met with the finals checks of the survey before you send it out. So this gives you the chance to preview the information, see the subject line and make sure that you are completely happy with the information before it lands in your customer/ customers inbox.
If there any elements for the survey that you wish to amend, all you have to do is click "Edit" by the different sections.

This is the final step in which you need to decide whether you would like to send the survey to your customers straight away or whether you would like to schedule it to suit a better time for your target audience

Everything's in place, so now all you have to do is click "Send".
Helpful Hint!
On your final screen you will see the web url of your Survey Link which you can share with other people who are not already in your Contacts list. When they click on your Survey Link and complete your Survey, they will have the option of filling in the data capture box which sits in the bottom left of their screen (provided that you've ticked the Data Capture box on Step 1) - with all this you are enabling to get the word out there about your business and gathering new potential customers.