1. Introduction
In this guide we'll be taking you through the steps of getting your email template built and hooked up to the Intouchcrm email editor - by the end of this guide you'll be able to add new stories to your template and change text quickly and easily without the worry of coding. (Don't forget that you can build new templates using our Drag + Drop Editor without the knowledge of html)
2. What you need before starting
1. An email template in HTML format - this should have been tested in at least one email client (although we'll cover that briefly later) and it should ideally follow email design best practice:
a. Built from tables, not divs
b. A maximum width of 600px
c. Inline CSS styling, not an embedded stylesheet
d. No javascript
2. A working Intouchcrm account with username and password.
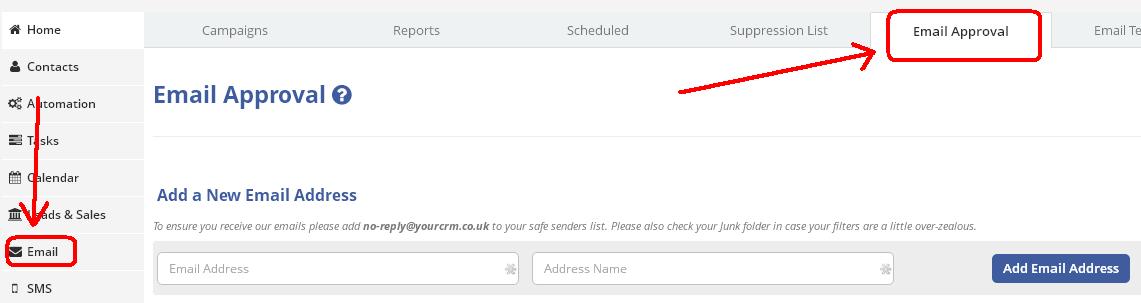
3. Within Intouchcrm you must have added and verified an email address in the "Email Approval" area (which can be found in the email section under the ' Email Approval' tab).
Tip: If you only have a JPEG, PNG, PSD or similar design file for your template you'll need to build the HTML first, or contact us and we'll build the HTML for you (we can also do everything in the guide for you, too!).
3. What we'll be doing/how our Editor works
For those of you who have used our "Freeform" editor you'll know that whilst it's easy to make changes to a template file, you can often find that the email produces unexpected results. We built our new editor to help users create more consistent emails more easily, with no fear about making changes that will break the email when you test or send.
The technology we use is called "Tags" - essentially these are smart little bits of code within the template that tell the Editor which areas should be editable, and what type of content these areas are.
It's important to keep in mind that you are creating a base template with little/no content, and adding tags to highlight where you will want to add/edit content in the future.
4. Selecting what areas you want to make editable
Open up your template, it doesn't matter whether it's in a web browser for now as we just want to assess how our template will work. We want to think about the following options:
1. What do we want to be editable
2. What do we want to be the same on every template
3. Are there any areas we'd like to repeat?
Below you'll see two images; the first is the HTML file we've designed and built. On the second you'll see we've identified what we want to do with each area on the template.
Image 1: The HTML file before any changes
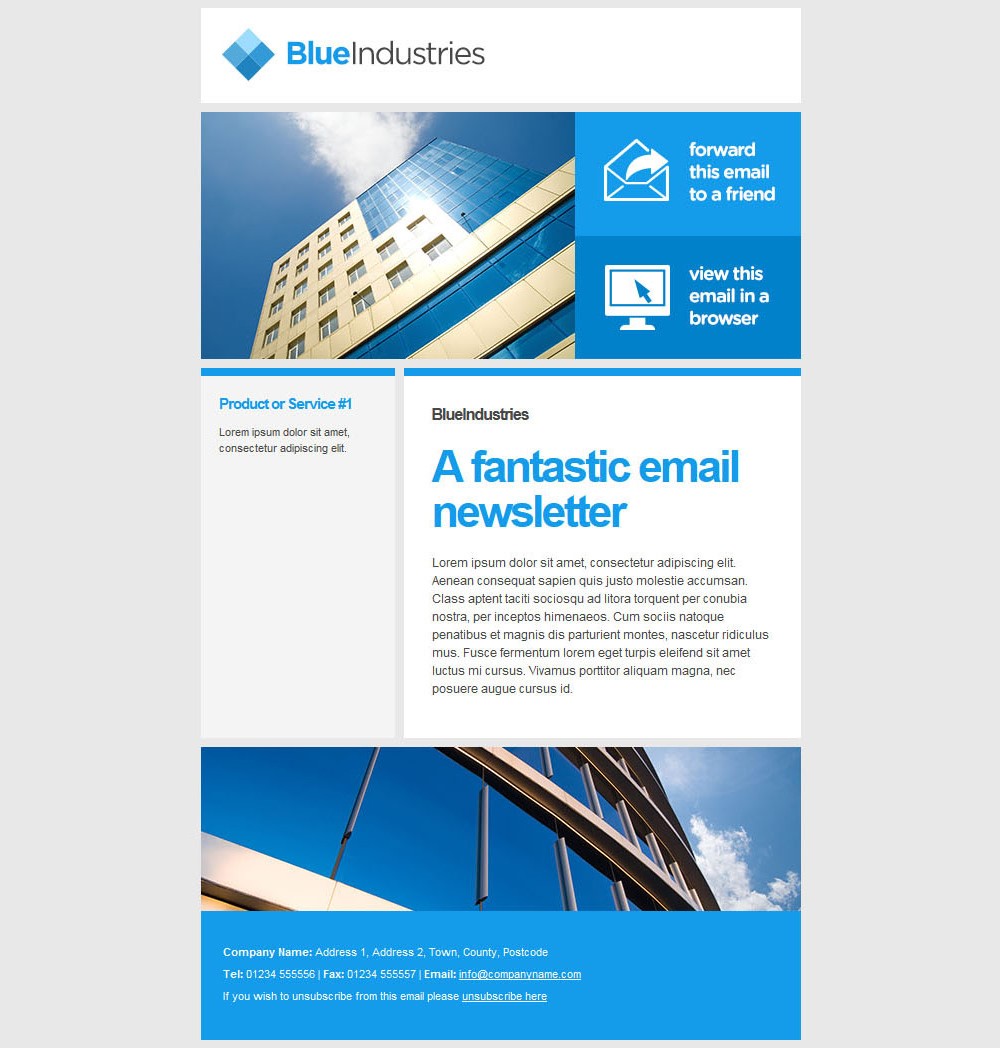
As you can see this is a fairly straightforward looking template, we've tested it already and know that the HTML works, but now we want to get it into the v6 editor format. So we'll identify what we want to do with it.
Image 2: After identifying what areas we want to amend
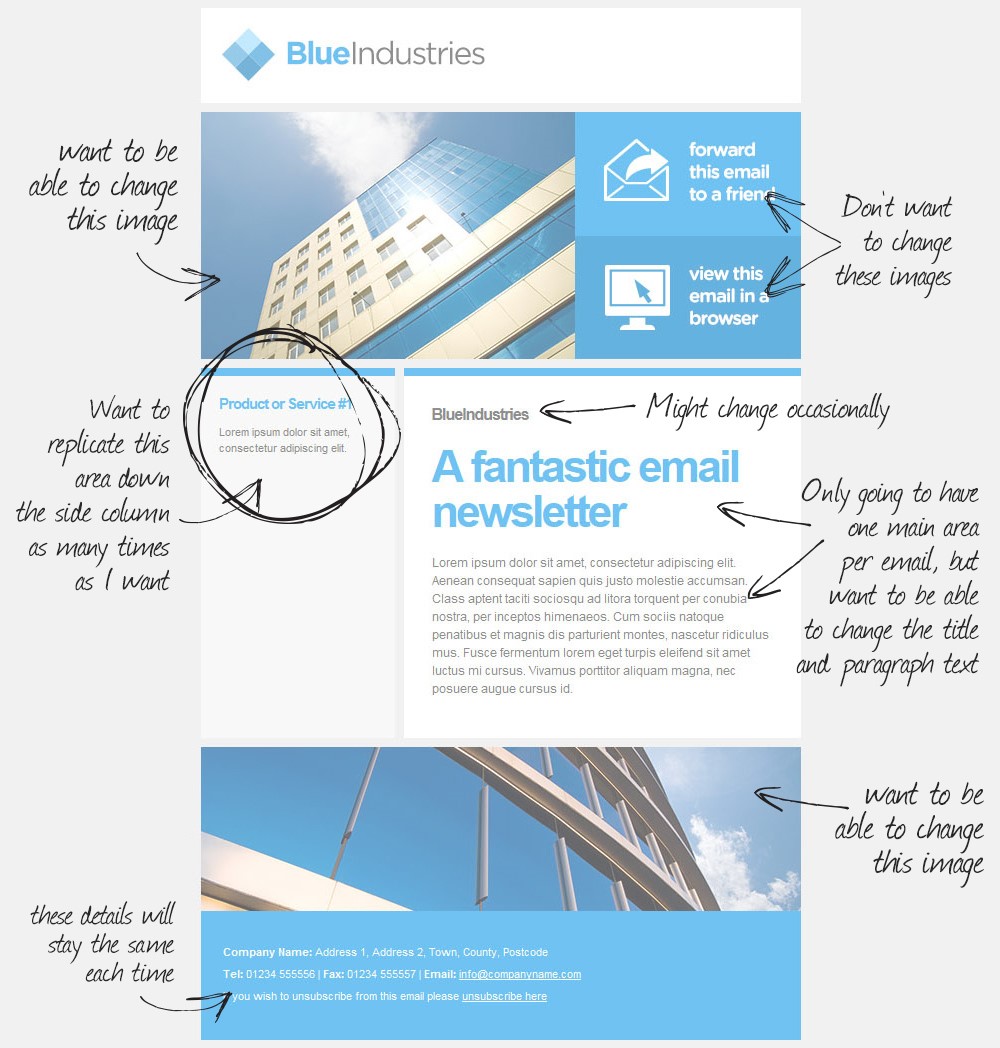
You'll see that we want to be able to change a couple of the images, most of the text, and have a repeating area on the left hand side. Now we'll move onto how to achieve that.
5: The Tags
As mentioned in section 3 the technology behind getting this working is "Tags" - and we're going to manually enter this code into the HTML file where needed to give the results we want. Below is a list of the Tags for reference, although we'll be going through them all individually as we amend this template.
· <%image default='YOURIMAGE.JPG' %>highlights an image that you want to be swappable
· <%title default='Your Title' %> allows users to edit the text, but not the formatting
· <%description default='Your Paragraph Text' %> indicates a large body of text, allowing users to edit both the text and the formatting including font styles like colour, alignment, bold, italic and underline
·
<itemlist></itemlist>everything
within these tags will be marked as an article, and within the editor users
will have the option to "Add New Article" which replicates this
section and everything in it to help you add consistent stories quickly and
easily.
note: there can only be one itemlist in
any one td cell
Warning: In addtion to those tags you'll also need to place an unsubscribe link somewhere in your email or the system won't allow you to send it
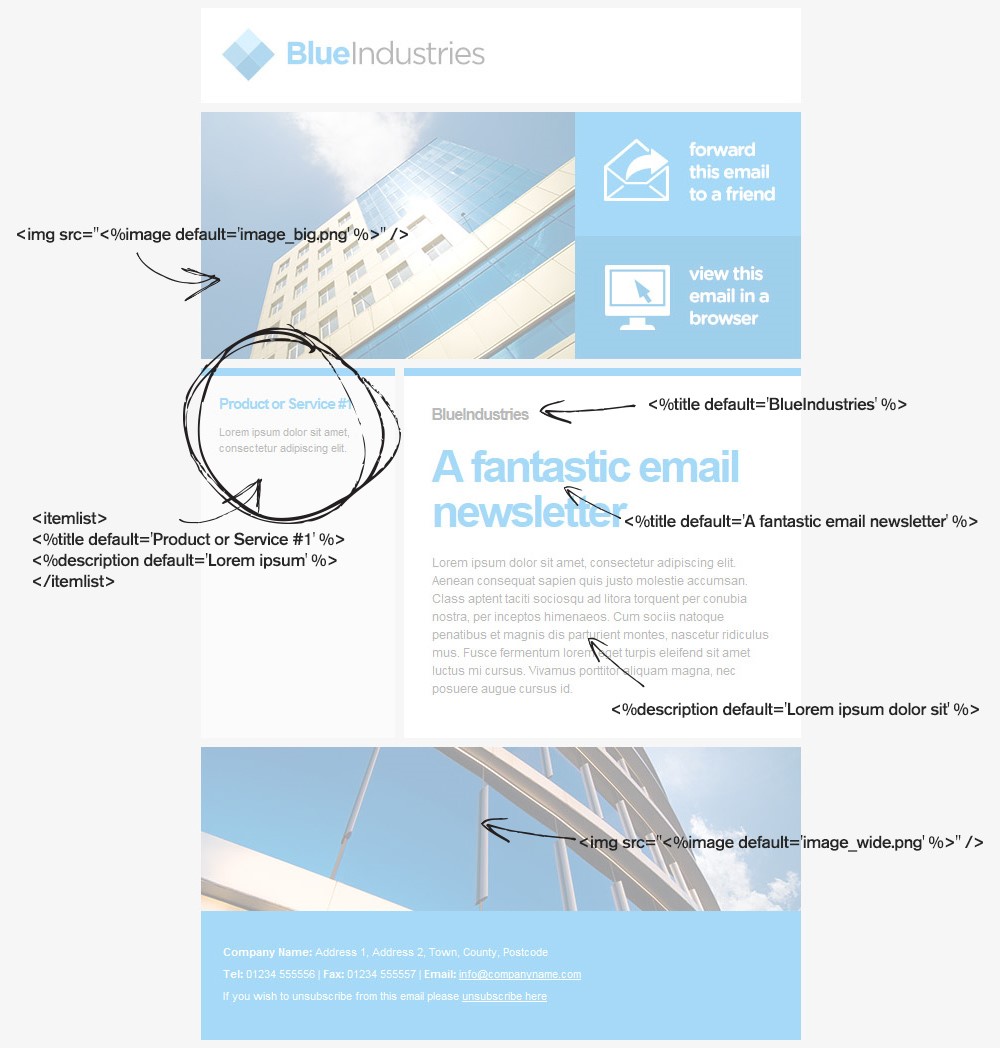
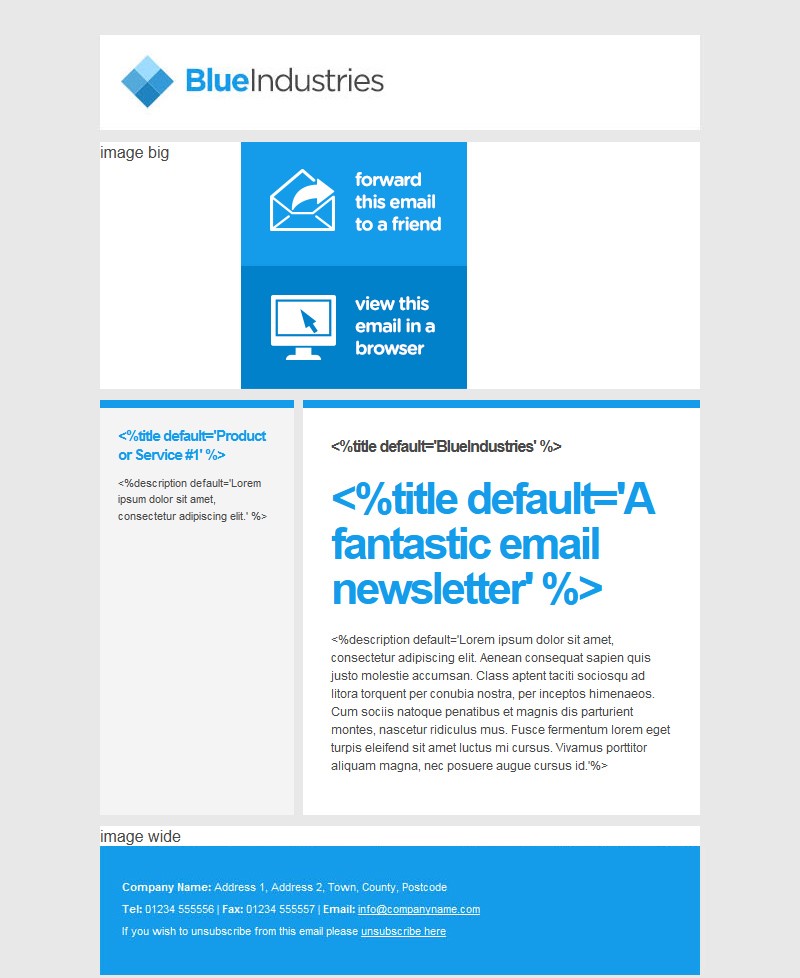
Now take a look at the image below - in this image we've swapped out the comments
for the actual tags that we're going to use. Don't worry about the details yet,
we'll cover each change individually next..
Now for a detailed breakdown of the changes to the HTML - it's a good idea to save yourself a backup of this HTML file now before making any changes to the HTML. You'll be able to make these changes in your favourite HTML editor, or simply open in Notepad (don't open it in Microsoft Word as it may add little bits of unwanted code that'll break your email!):
|
What we're doing |
Original HTML |
New HTML with our changes applied |
|
Making the top image editable |
<img width="374" height="247" src="image_big.png"/> |
<img width="374" height="247" src=" <%image default='image_big.png' %>" /> |
|
Note: you must specify a height and width for the image in the HTML. Otherwise any images you swap in will not match the existing height and width and you'll end up with huge images breaking your template! |
||
|
Making the Company name editable |
<h2>BlueIndustries</h2> |
<h2><%title default='BlueIndustries' %> </h2> |
|
Note: titles allow you to edit the text, but not add any links or change the styling of the text |
||
|
Making the main story title text editable |
<h1>A fantastic email newsletter </h1> |
<h1><%title default='A fantastic email newsletter' %> </h1> |
|
Note: titles allow you to edit the text, but not add any links or change the styling of the text |
||
|
Making the main story paragraph editable |
<p>Lorem ipsum dolor sit amet, consectetur adipiscing. </p> |
<p><%description default='Lorem ipsum dolor sit amet, consectetur adipiscing.'%> </p> |
|
Note: descriptions allow you to change the text itself as well as font styling like colour, alignment and style such as bold/italic/underline. You can also create links in the description text. |
||
|
Creating a repeating left article, and make the title and paragraph inside it editable |
<h3>Product or Service #1 </h3> <p>Lorem ipsum dolor sit amet, consectetur adipiscing elit. </p> |
<itemlist> <h3><%title default='Product or Service #1' %> </h3> <p><%description default='Lorem ipsum dolor sit amet, consectetur adipiscing elit.' %> </p> </itemlist> |
|
Note: we've removed the inline styling to keep the code short, but you must style items inline or they won't be picked up by some email clients and they'll end up looking very ugly… |
||
|
Making the bottom image editable |
<img width="600" height="164" src="image_wide.png"/> |
<img width="600" height="164" src=" <%image default='image_wide.png' %>" /> |
|
Note: Remember, you must specify a height and width for the image in the HTML. Otherwise any images you swap in will not match the existing height and width and you'll end up with huge images breaking your template! |
Note: we've removed inline styling in the above code to
keep it short, but you
must style items inline or they
won't be picked up by some email clients and it'll end up looking very ugly…
Warning:
at this point make sure you have
included an unsubscribe tag in your email, otherwise it won't send. You can
either put this straight into some text in the template by adding %unsubscribe% but if you'd prefer not
to have a big long URL in your email you can place it inside a link such as
<a href="%unsubscribe%>Click
here to unsubscribe</a> which looks a lot cleaner!
Nearly there! Now that we've made the changes you'll probably notice that your email looks a bit of a mess in an internet browser, that's normal, see below for what ours looks like at the moment for some reassurance!
6. Loading the template
When you load editor templates the system needs at least two things of the following three items:
1. A HTML file - the code of your email template
2. A ZIP of all of your images - uploading single images at a time will not work
3. Screenshot file (optional) - only used as a quick preview in the "My Templates" gallery
Go to Email > Email Templates tab then click the Add New Editor Template button.
Fill out the details and choose your HTML, Zip and screenshot files.
Click the blue Add Template button when you are ready.
Once you've added a template with at least two of the three items above the system will do the hard work and match up the HTML to your images. The template will now be ready to use and can be found in Email > Create an Email Campaign > Step 2: Pick a Template > #My Templates. Take a look at the screenshots to see it in action:
You'll notice little icons and buttons have appeared next to text that you've made editable. You'll also be able to click on images and replace them with others you can upload.
Now you're free to add whatever content you want and build your campaign.
7. Test & Send
Now add contacts, test the email and send it as you would any other. It's that simple.
There are a couple of ways to test your new email template: -
a.
Run
a campaign preview within the system
or
b. Create yourself a few free emails in the most popular email clients
Option “a” – Campaign Preview
Campaign Preview is a tool found within the system, which effectively sends a version of your email to several different email clients with different options turned on and off IE Images, spam filters, etc.
This allows you to see exactly what the end recipient will see and make any adjustments before going on to use the new template in your everyday campaigns.
Running a Campaign Preview does cost but gives you great insight into your future use of the template
Option “b” – Creating free email addresses
The most popular email clients out there are Gmail, Hotmail/Windows Mail, Yahoo!, etc all of which are free to sign up to and create your own new, unique email address with. This enables you to then add them to your system as a test group to communicate with and check your newly created template.
This option presents one that is cheaper financially but more time consuming, as you will have to log into each one individually to check the campaign.
8. Help/Frequently Asked Questions
The first area works, but none of the
others!
Make sure you've closed the tags (most likely the first one used) with '%>,
otherwise the editor won't know where it ends!
The text is working, but not the images
Double check the formatting of the image tags, they aren't quite the same as
the text tags. Your formatting should look like this:
<img src="<%image default='YOURIMAGE.JPG'
%>"/>
Remember things like the quotation marks, speech marks, and closing image tags.
My <itemlist> is not working
Make sure you have only used one <itemlist> per area on the template,
putting two will cause the template to crash as it won't know which one you
want to repeat.
When I upload a new image it doesn't fit the space as it shouldHave you made sure to set the height="" and width="" dimensions of the image in the template?
I am getting
an unsubscribe error, why can't I send?
You have forgotten to include the %unsubscribe% tag, see the warnings in
section 5 for more info.